
By John Gruber

Build anything with exe.dev. It’s just a computer.
Hacking Apple’s Weather Widget to Show the Time of the Last Update
Monday, 27 June 2005
[Update 28 Sep 2009: The instructions on this page no longer work with the current version of the Weather widget on Mac OS X 10.6.1. TJ Luoma has kindly posted updated instructions here.]
My favorite Dashboard widget to date, by far, is Apple’s Weather widget. It’s the only one I keep running at all times, and I refer to it often to check the temperature. In theory, my usage of the Weather widget fits perfectly with the way Apple intended widgets to be used:
- Hit the key to invoke Dashboard
- Glance at the temperature
- Hit the key again to go back to whatever I was doing
Just one problem, though: the Weather widget only syncs its data periodically, and only while it’s displayed. So sometimes when you show it, it displays hours-old weather info for a few seconds until it has time to fetch updated data from AccuWeather. So in practice, my usage of the Weather widget was like this:
- Hit the key to invoke Dashboard
- Glance at the temperature
- Wait a few seconds to see if it changes
- Hit the key again to go back to whatever I was doing
Sometimes you can know at a glance that the data is stale and needs to updated; e.g. if you’re checking at night and the Weather widget is still displaying the sun, or vice-versa. Other times, however, it’s hard to tell, so I ended up waiting sometimes even when I didn’t need to.
My frustration was that I wanted to know at a glance whether I needed to wait for updated data. So I hacked it.
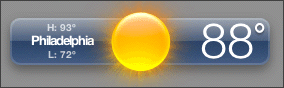
Here’s the top-left corner in Apple’s original widget:
And here’s my hacked version:
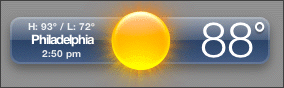
The differences:
I moved today’s predicted high and low temperatures together, above the name of the city.
Underneath the city name, I display the time of the last data sync.
So, if the time displayed in my hacked Weather widget is close to now, I know the data is fresh, and there’s no need to wait. If time is more than an hour ago, I know I need to wait.
Update: A few readers have pointed out that the degree symbol in the top-right corner of the Weather widget pulses when you first display the widget, and it stops pulsing when the data has been refreshed. I never noticed this. But, still, I enjoy knowing just how current the data is, and so I probably would have written this hack even if I’d noticed.
How to Apply the Hack
The first thing you need to do is make a copy of Apple’s original Weather.wdgt package. I can’t emphasize this strongly enough: Make a copy, then hack the copy.
I moved my copy of the Widget.wdgt package to the Widgets folder in my
user account: /Users/gruber/Library/Widgets/Weather.wdgt.
By placing the widget here, it will replace the original Weather
widget in the Widget Bar in the Dashboard layer, but Apple’s original
Weather widget still resides at its normal location in the top-level
(local domain) Library folder: /Library/Widgets/Weather.wdgt.
This way, if Apple updates the Weather widget in a future release of Mac OS X, you can just move or delete the hacked version in your home folder to revert to Apple’s.
Once you’ve made a copy, open the package with the Finder’s Show Package Contents contextual menu command.
Open ‘Weather.html’.
Change line 68 from:
<div id='high' class='text info smallinfo'></div>To (this should all be on one line):
<div id='high-lo' class='text info smallinfo'>
<span id="high"></span> / <span id="lo"></span></div>
Change line 70 from:
<div id='lo' class='text info smallinfo'></div>To:
<div id='updatetime' class='text info smallinfo'></div>Save and close ‘Weather.html’.
In the original widget, there are two separate
<div>tags for the predicted daily high and low temperatures; the high div is above the location div, the low div below. Both tags are empty in the HTML, because the actual temperature values are set dynamically by the JavaScript later on. (This is pretty much how most widgets are architected: the HTML is an empty framework, and the contents are filled in by JavaScript that modifies the HTML document dynamically via DOM scripting.)In this hack, we’re putting both the high and low temperatures into a single div, above the location. To reflect this change in our element names, we change the name of this div from “high” to “high-lo”. I added spans within the div for the high and low temperatures, using the same
highandloelement IDs used in Apple’s original widget. This allows Apple’s original JavaScript code for updating the high and low temperatures to continue working without change — the JavaScript doesn’t care whether thehighandloelements are now spans instead of divs.This allows us to use the other div, where the low temperature used to go, for displaying the time of the last update.
Open ‘Weather.css’.
Change line 77 from:
color: rgba(255, 255, 255, .7);To:
color: rgba(255, 255, 255, .85);This change isn’t necessary for the hack; all it does is use a bit less transparency for the text in the
smallinfoclass. This class is used for both the divs we’re hacking.Change line 81 from:
#high {To:
#high-lo {Lastly, change line 85 from:
#lo {To:
#updatetime {Save and close ‘Weather.css’.
None of these changes to the CSS are strictly necessary; we could have just kept using the original element ID names in our hack. But even in a short hack such as this one, it’s a good idea to keep your variable / ID names accurately descriptive; it’s a recipe for confusion to have a div named “lo” which contains a time, not a temperature, or to have a div named “high” which contains both a high and low temperature.
Open ‘Weather.js’.
After line 257, insert the following lines:
// Format the time of the last data refresh
var h = object.time.hour;
var ampm = 'am';        // default to am
if (h == 12) {          // noon
    ampm = 'pm';
} else if (h == 0) {    // midnight
    h = 12;
} else if (h > 12) {
    h -= 12;
    ampm = 'pm';
}
var m = object.time.minute;
if (m < 10) {
    m = '0' + m;
}
document.getElementById('updatetime').innerText =
        h + ':' + m + ' ' + ampm;
Here’s what the JavaScript snippet does:
The code is inserted into the widget’s
handleDataFetched()function, which, as its name implies, is called whenever new data has been fetched and needs to be displayed. The object namedobject(Apple’s variable name, not mine) already contains atimeattribute with the hour and minute of the last update. The original widget never displays this time, but it uses the time to decide whether the current data is old and needs to be refreshed.So we build three variables:
h,m, andampm(which is set to either “am” or “pm”).object.time.houruses 24-hour time, so it ranges from 0-23. If it’s 12, we changeampmto “pm”; if it’s 0, we changehto 12; if it’s greater than 12, we subtract 12 and changeampmto “pm”. (Update: If you’d prefer a 24-hour time format, Eric Meyer has instructions for you.)For the minutes, we need to concatenate a leading ‘0’ character if the value is less than 10; otherwise, if the time were 2:04, we’d see “2:4”. (JavaScript has no equivalent to Perl’s or C’s
sprintf().)Finally, we use DOM scripting to set the contents of the element with ID “updatetime” to the time.
Save and close ‘Weather.js’, then open your hacked Weather widget in Dashboard. It should show the daily high and low together on one line, and the time of the last update below the location.
| Previous: | Making Book |
| Next: | Shuffling |